How to Use a Slip Bobber for Walleye & Crappie
Most anglers have experienced the absolute frustration of seeing big Walleye or a school of slab Crappies on their electronics, only to realize their bait is nowhere near the strike zone. Fixed bobbers limit you to shallow water, and vertical jigging often scares off finicky fish in clear Minnesota lakes. This guide solves that problem by teaching you the most versatile technique in your arsenal: the slip bobber.
Why the Slip Bobber is a Minnesota Staple
If you have ever spent a breezy afternoon on Mille Lacs or navigated the weedy bays of Lake Minnetonka, you know that depth control is everything. The slip bobber is a fundamental tool for any serious Minnesota angler because it allows you to present a live bait naturally at any depth, whether that is four feet or forty. Unlike a traditional "clip-on" bobber that stays fixed in one spot on your line, the slip bobber slides freely. It is stopped only by a small knot or "stop" that you can slide up and down your line to reach exactly where the fish are holding.
Overcoming Depth Limitations
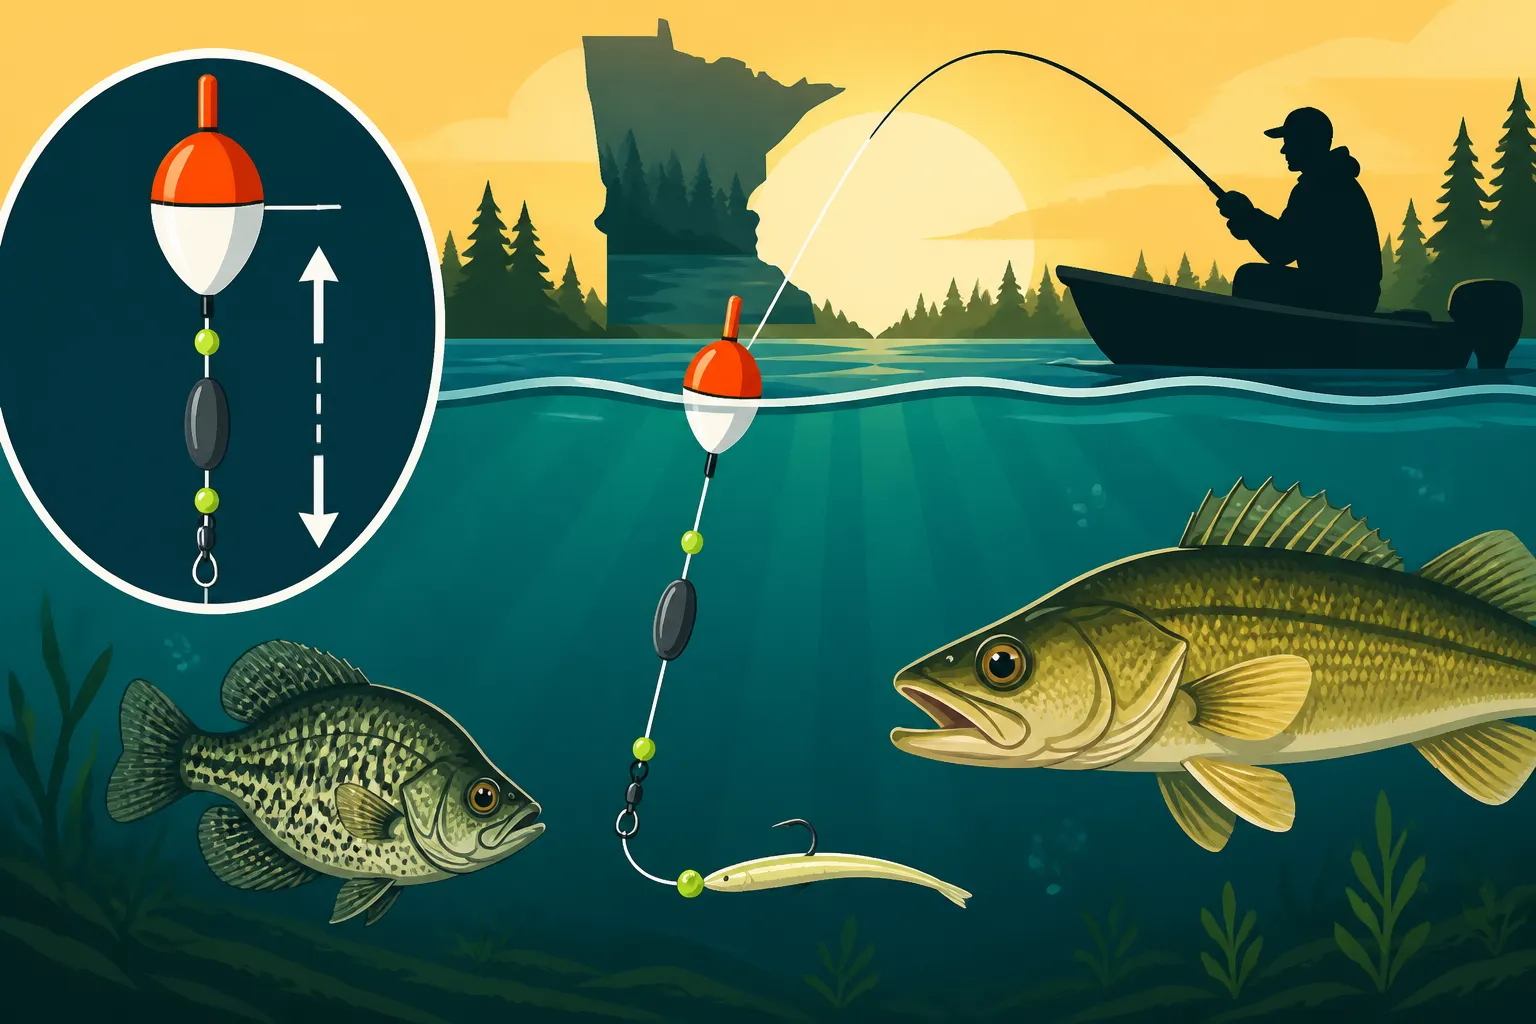
The primary reason we use this rig is the simple physics of casting. Try casting a fixed bobber set at ten feet deep, and you will find yourself in a tangled mess of line and frustration before the bait even hits the water. In many of our deeper glacial lakes, Walleye will often suspend over rock piles or transition zones that are well beyond the reach of a fixed float. By using a slip bobber, the float rests against your weight while you cast, allowing for a standard, long-distance throw. Once the bait hits the water, the line slides through the bobber until the stop hits the top of the float, positioning your leech or minnow perfectly in the "eye-level" of a hungry Walleye.
The Stealth Factor in Clear Water
Minnesota has seen a significant increase in water clarity over the last decade, partly due to the spread of invasive species. While clear water is beautiful, it makes the fish incredibly "spooky." If you park your boat directly over a school of fish to vertical jig, they often scatter. The slip bobber allows you to keep your distance. You can anchor up-wind of a prime piece of structure and drift your presentation right into the kitchen. This stealthy approach is often the only way to trigger a bite from pressured fish on popular lakes. Before you head out to test these clear-water theories, make sure your paperwork is in order by checking the Minnesota Fishing License: Cost, Types & How to Buy (2026).
Essential Gear for Your Slip Bobber Rig
To master this technique, you cannot just grab any old float from the bargain bin. The components of your rig need to work in harmony. If the hole in your bobber is too small, the line won’t slide. If your weight is too light, the bait will never reach the bottom. You want a setup that is sensitive enough to register a Crappie’s "up-feed" but sturdy enough to handle a thrashing ten-pound Walleye.
Choosing the Right Bobber Style
For Walleye, most veteran anglers prefer balsa wood slip bobbers. Balsa is highly buoyant and has a natural feel that does not offer too much resistance when a fish pulls it under. Look for the "cigar" or "pear" shapes. The cigar shape is excellent for choppy water because it cuts through the waves without bouncing your bait too aggressively. For Crappie, you should downsize significantly. A small, narrow "pencil" style slip bobber is ideal. These are incredibly sensitive; even the slightest lift from a Crappie will cause the bobber to tip over or wobble, signaling a bite before the fish even feels the float. You can often find great bulk deals on these balsa floats through retailers like Amazon, which is helpful since we all eventually lose a few to the occasional snag.
Rods, Reels, and Line Selection
The ideal rod for slip bobbering is a 7-foot to 7-foot 6-inch medium-light power spinning rod with a fast action. You need that extra length to pick up slack line quickly when you set the hook. A longer rod also helps you "mend" the line on the surface of the water if the wind is creating a large bow in your line. As for the reel, a 2500 or 3000 series spinning reel works perfectly.
When it comes to line, many people make the mistake of using heavy braid. While braid is strong, it can sometimes be too limp, causing it to wrap around the tip of the bobber. I personally recommend a high-quality 6lb or 8lb monofilament or a "superline" with a fluorocarbon leader. Monofilament floats better than fluorocarbon, which keeps your line on the surface and prevents it from sinking and dragging your bobber out of position. If you are looking for specific gear recommendations, you might find some useful insights in our Best Walleye Rods & Reels guide.
Hooks, Weights, and Knots
Your terminal tackle is where the "magic" happens. For Walleye, a #4 or #6 octopus hook is the gold standard. If the water is particularly stained, using a colored hook or a small 1/32 oz jig head can add just enough flash to get noticed. For Crappie, a #8 or #10 light-wire hook is better, as it allows the minnow to swim more freely.
Weights are crucial. You want just enough weight to pull your line through the bobber quickly, but not so much that it sinks the float. I like to use a small egg sinker or a few split shots placed about 12 to 18 inches above the hook. To protect the bobber and the knot, place a small plastic bead between the bobber stop and the bobber itself. These small components, like beads and specialized weights, are easily sourced in kits on Amazon if your local bait shop is out of stock.
Setting Up the Perfect Slip Bobber Rig Step-by-Step
Precision is the difference between a bucket full of fish and a long boat ride home. Setting up the rig correctly ensures that your line flows freely and your depth is accurate every single time. It is a simple process, but skipping a step like adding a bead can lead to the bobber stop getting stuck inside the float, ruining your depth setting.
The Anatomy of the Rig
First, slide your bobber stop onto the main line. These usually come on small plastic tubes; you slide the line through the tube, pull the knot off onto the line, and then pull the ends of the thread to tighten it. Next, add your bead. This is a non-negotiable step. The bead acts as a buffer, preventing the knot from jamming. Then, thread your slip bobber onto the line. Below the bobber, you will add your weight. Finally, tie on your hook or small jig. If you need a visual refresher, check out our guide on How to Set Up a Slip Bobber Rig Step by Step.
Tying the Bobber Stop
The bobber stop is the most important part of the rig because it determines your depth. Once you have tightened the knot onto your line, do not trim the tags too short. Leave about half an inch of thread on either side. If you trim them too close, the knot can unspool, or it may catch on the guides of your rod during a cast. Leaving a little "whisker" allows the knot to glide through the rod guides smoothly. If the knot starts to slide too easily after a few hours of fishing, simply pull the tag ends again to tighten it back up.
Targeting Minnesota Walleye with Slip Bobbers
In Minnesota, Walleye fishing and slip bobbers go hand-in-hand, especially during the summer months when fish move to deeper reefs. While many people prefer Jigging for Walleye: Jig & Minnow Basics, there are days when the fish want a dead-still presentation. This is when the slip bobber outshines every other method.
Fishing the Reefs and Mud Flats
Lakes like Mille Lacs are famous for their expansive mud flats and rocky reefs. Walleye will often hold right on the edges of these structures. The trick is to find the depth where the fish are holding using your electronics, then set your bobber stop so the bait sits about 6 to 12 inches above them. Walleye look up to hunt. If your bait is below them or buried in the rocks, they will never see it.
When fishing reefs, you want to position your boat so you can cast into the wind and let the bobber drift over the top of the rocks. This provides a natural movement that mimics a disoriented baitfish or a wandering leech. If you are fishing a lake with specific restrictions, always double-check the Mille Lacs Walleye Regulations (2026) before you drop your lines.
Low-Light and Night Strategies
Walleye are notoriously light-sensitive. Their "glassy" eyes are designed to hunt in low light, which is why the "evening bite" is so legendary in the Northwoods. Slip bobbering is arguably the best way to fish at night. You can buy lighted slip bobbers or "glow sticks" that clip onto your float. Watching a glowing red or green light suddenly vanish beneath the black surface of the water is one of the most exciting moments in fishing. During these night sessions, Best Live Bait for Walleye (Leeches, Minnows, Crawlers) like a jumbo leech is usually your best bet, as the undulating movement is irresistible to a prowling Walleye.
Masterclass on Crappie Fishing with Slip Bobbers
While Walleye anglers use slip bobbers to reach the depths, Crappie anglers use them for surgical precision. Crappies are notorious for suspending at very specific depths. If they are sitting at 10 feet in 20 feet of water, a bait at 12 feet will be completely ignored.
Finding Suspended Schools in the Spring
Spring is the peak season for Crappie. As the water warms, they move toward the shallows to spawn, but they often "stage" in deeper water just outside the spawning beds. Using a slip bobber during Spring Crappie Fishing in Minnesota allows you to hover a minnow right in their faces without having to move your boat constantly.
Look for schools on your side-imaging or down-imaging sonar. They will often look like a "cloud" of small dots. Once you find them, set your depth so your small minnow or 1/16 oz jig hangs just above the school. Crappies are much more likely to move up to hit a bait than to move down. If you aren't getting bites, raise your bobber stop by six inches and try again.
Brush Piles and Timber Tactics
Crappies love "heavy cover"—downed trees, submerged brush piles, and dock pilings. Fishing these areas with a standard lure is a recipe for losing gear. However, a slip bobber allows you to drop a bait vertically into small openings in the wood. By keeping the bait stationary, you minimize the chance of your hook catching a branch. This is where the "pencil" style bobber really shines, as it lets you see those subtle "lifting" bites that occur when a Crappie inhales the bait and swims upward, taking the weight off the line. For more detailed species-specific advice, dive into our Crappie & Panfish Fishing Techniques guide.
Advanced Tips and Troubleshooting
Even the best technique has its challenges. Wind, current, and subtle biting fish can make slip bobbering tricky for the uninitiated. Mastering these small details will move you from an amateur to a veteran angler.
Dealing with Wind and Drift
Wind is both your friend and your enemy. It creates "Walleye chop," which oxygenates the water and makes fish more active, but it also pushes your bobber too fast. If your bobber is racing across the water, your bait will be trailing behind it at an angle rather than hanging vertically. To fix this, you can add more weight to keep the line vertical, or you can use a "drift anchor" (a parachute-like bag) to slow your boat's movement. On a windy day on a lake like Lake Winnibigoshish, managing your drift is the key to staying over the fish. You can find high-quality drift socks and anchors on Amazon that fold up small and fit right in your boat’s storage compartment.
Identifying the Subtle "Bite"
Not every fish slams the bobber under. Sometimes, the bobber will simply stop moving with the waves. Other times, it might just tilt slightly. This is often the case with jumbo Perch or finicky Walleye. If the bobber does anything "unnatural," it is time to get ready.
Before you set the hook, reel in the slack line until you can just start to "feel" the weight of the fish. If you feel resistance, snap the rod upward firmly. If you set the hook while there is still a big bow of line on the water, you will likely miss the fish. Keeping your line as straight as possible between the rod tip and the bobber is essential for a high hook-up ratio.
Summary Table of Species Settings
| Feature | Walleye Setup | Crappie Setup |
|---|---|---|
| Bobber Style | Large Balsa (Cigar/Pear) | Small Pencil or Mini-Cigar |
| Hook Size | #4 – #6 Octopus | #8 – #10 Light Wire |
| Preferred Bait | Leech, Fathead, or Shiner | Small Crappie Minnow or Waxworm |
| Depth Strategy | 6-12" off the bottom | Above suspended schools |
| Line Weight | 6lb – 8lb Monofilament | 4lb – 6lb Monofilament |
| Primary Location | Rock piles, Reefs, Mud Flats | Brush piles, Docks, Weed edges |
Success in the Land of 10,000 Lakes
The beauty of Minnesota fishing is the variety. One day you might be chasing trophy fish on the Mille Lacs Lake Fishing Guide: Walleye, Bass & More, and the next you might be exploring a small, unnamed pond in the metro. The slip bobber is the one tool that transitions perfectly between all these environments. It rewards patience, precision, and a bit of "Minnesota Nice"—sharing the water and respecting the resource.
As you plan your next outing, remember to keep an eye on the latest Minnesota Fishing Limits: Bag & Possession (2026) to ensure our lakes remain healthy for years to come. Whether you are a seasoned pro or taking the kids out for their first time, the sight of a bobber slowly slipping beneath the surface never gets old. It is the heartbeat of fishing in the North, and now you have the knowledge to master it.
Disclaimer
The information provided in this guide is for educational and informational purposes only. Fishing regulations in Minnesota, including seasons, limits, and equipment restrictions, are subject to change by the Minnesota Department of Natural Resources (DNR). Always check the most current official DNR regulations before heading out on the water. Fishing involves inherent risks, including weather changes and water safety; always wear a life jacket and practice safe boating. The mention of third-party retailers like Amazon is for contextual convenience and does not constitute a legal endorsement. Use of live bait must comply with Aquatic Invasive Species (AIS) laws to protect our local ecosystems.