How to Set Up a Slip Bobber Rig Step by Step
Ever feel like you’re missing bites because your bobber is just too far from the fish, or struggling to adjust your depth in deeper water? It’s a common frustration, especially when targeting suspended walleye or crappie that are hanging out at precise depths. This guide is all about mastering the slip bobber rig, a game-changing setup that allows you to easily fish at any depth, making your time on Minnesota's beautiful lakes far more productive and less exasperating.
Why Embrace the Slip Bobber Rig for Minnesota Fishing?
If you’ve spent any time on the water with a traditional fixed bobber, you know its limitations. While great for shallow water, they become a real headache when fish are holding deep, making long casts nearly impossible. The slip bobber rig revolutionizes how you present your bait, giving you unparalleled control and sensitivity.
Overcoming Depth Challenges
Think about it: with a fixed bobber, your bait is always suspended at the same, well, fixed depth below the bobber. If you want to fish 15 feet down over 25 feet of water, you’re either using a ridiculously long leader that’s impossible to cast, or you’re simply not reaching the fish effectively. It's a logistical nightmare, right?
This is where the slip bobber shines. Your fishing line slides through the bobber itself. The depth is determined by a small "bobber stop" knot or bead on your main line. You can slide this stop up your line to fish deeper, or down to fish shallower. This simple mechanism allows you to cast your bait and bobber together, and as the rig sinks, the line slides through the bobber until the bobber stop hits the top of the bobber. Voila! Your bait is now suspended at your exact desired depth, even if it’s 20 feet down. This is particularly crucial for species like crappie that often suspend at specific depths over open water, or walleye holding just off a deep break line. It opens up so many new possibilities for targeting fish that were previously out of reach with traditional bobbers.
Enhanced Sensitivity and Bite Detection
Another huge advantage of the slip bobber rig is its superior sensitivity. Because your line passes freely through the bobber, a fish taking your bait experiences minimal resistance. This means even the most finicky fish, like light-biting crappie or walleye that are just mouthing the bait, are less likely to feel the pull of the bobber and spit the hook. The bobber itself is often a bit heavier and more stable than a typical clip-on bobber, offering better visibility and stability in choppy conditions or light currents without hindering the bite.
Imagine you're trying to entice a subtle bite on a calm evening on Lake Winnibigoshish. With a fixed bobber, that slight twitch might be masked by surface tension or wind. With a slip bobber, that subtle dip, sideways movement, or even just the disappearance of the bright tip is a clear signal. The bobber often stands tall, with only the brightly colored top showing, making any deviation incredibly obvious. This makes it easier to detect those tentative bites that often go unnoticed, leading to more hooked fish and fewer frustrations. This sensitivity is a major reason why many experienced anglers use them when fishing for Walleye Fishing Techniques: Complete Minnesota Guide or Crappie & Panfish Fishing Techniques.
The Essential Components of a Slip Bobber Rig
Setting up a slip bobber rig is straightforward once you know the pieces. Each component plays a crucial role in creating this versatile setup. You'll find most, if not all, of these items readily available at your local bait shop or online platforms like Amazon.
The Slip Bobber Itself
This is the star of the show, naturally. Unlike clip-on bobbers, a slip bobber has a channel or hole running through its center, allowing your main fishing line to pass freely through it. They come in a wide array of sizes, shapes, and materials. You'll find everything from slender, sensitive balsa wood bobbers to durable, buoyant plastic or foam models.
Choosing the right slip bobber depends largely on the weight of your bait and tackle, and the species you're targeting. For instance, if you're using a tiny tungsten jig for panfish, a smaller, more sensitive bobber like a Thill Crappie Cork or a Northland Tackle Lite-Bite will be ideal. It'll show the slightest tap. If you're suspending a lively shiner for walleye, you'll need a larger, more buoyant bobber to keep that bait in place without submerging too much. The key is to have enough buoyancy to keep your bait suspended and visible, but not so much that it creates excessive resistance for the fish. A well-matched bobber will ride high enough to be seen but will stand upright and sensitive to any downward pull.
The Bobber Stop
This tiny, yet incredibly important, component is the key to setting your depth. The bobber stop is essentially a small knot or a piece of rubber that you cinch onto your main fishing line. Its purpose is to physically stop the slip bobber from sliding further down your line, thereby dictating how deep your bait will suspend.
Most anglers opt for pre-tied string bobber stops, which usually come on a small plastic sleeve. You simply thread your main line through the sleeve, slide the string knot off the sleeve and onto your main line, and then gently pull the tag ends of the string to tighten it. These string stops are fantastic because they're small enough to pass through your rod guides with ease during a cast, yet sturdy enough to hold their position once set. Some anglers also use small rubber bobber stops, which are even simpler to apply. Without a reliable bobber stop, your slip bobber rig is just a regular bobber that slides off your line!
Weighting Your Rig
Proper weighting is critical for a slip bobber rig to work effectively. You need enough weight to accomplish two main things: first, to get your bait down to the desired depth, especially if you're using light baits; and second, to balance your bobber so it sits upright in the water, exposing only its highly visible tip.
The most common choices for weighting include split shot sinkers, which can be easily crimped onto your line, or small sliding egg sinkers or bullet weights. If using a sliding weight, you'll typically place it above a small swivel or directly above your hook, depending on your preferred setup. For example, if you're fishing for walleye with a leech, you might have a single split shot a foot or so above your hook to help the bait sink, or a small sliding egg sinker that rests on the swivel just above your leader. The goal is to "load" the bobber just enough so that it stands up straight but doesn't sink from the weight alone. This balance makes the bobber extremely sensitive to a fish taking the bait, as even a slight pull will cause it to dip or move. This also helps with casting distance, ensuring your presentation lands where you intend, especially when fishing for species like Yellow Perch & Sauger in Minnesota in deeper areas.
Hook and Leader Selection
Your choice of hook and leader is largely dependent on the bait you're using and the species you're after. For live bait presentations, which are incredibly effective with slip bobbers, you'll typically use a plain snell hook (like a Kahle hook for minnows or a baitholder hook for worms/leeches) or a small treble hook for larger minnows. If you're fishing with artificial baits, a jig head is almost always the choice.
A fluorocarbon leader, typically 12 to 24 inches long, is often a smart addition, especially in clear Minnesota lakes. Fluorocarbon is nearly invisible underwater, making your presentation more stealthy. It also offers good abrasion resistance, which is handy if you’re fishing around rocks or submerged timber. The leader is usually tied to a small swivel below your weight, which also helps prevent line twist. When fishing for Bluegill Fishing Tips for Minnesota Anglers with small maggots or waxworms, a tiny bare hook, sometimes even a fly hook, under a very light jig or split shot, can be incredibly effective. Consider your bait and target, then select a hook size and leader strength that offers the best presentation and strength.
| Component | Purpose | Key Considerations |
|---|---|---|
| Bobber Stop | Sets the maximum depth of your bait | Must be small enough to pass through rod guides, tight enough to hold position, but adjustable. Commonly string or rubber. |
| Bead | Protects bobber stop knot from bobber hole | Prevents wear and tear on the bobber stop, ensures it remains effective and doesn't get pulled into the bobber. |
| Slip Bobber | Indicates bites, suspends bait | Match size to bait weight for optimal sensitivity. Various shapes (round, pear, pencil) and materials (balsa, plastic). |
| Weight (Sinkers) | Sinks bait, balances bobber | Use just enough to stand bobber upright. Common types: split shot, sliding egg sinkers, bullet weights. |
| Swivel (Optional) | Prevents line twist, connects leader | Useful below sliding sinkers or to connect a fluorocarbon leader to your main line. |
| Hook/Jig | Attaches bait, catches fish | Match size and style to bait and target species (e.g., small jig for crappie, plain hook for walleye minnow). |
Step-by-Step Rigging for Minnesota Waters
Now that we know the components, let’s get down to actually putting this rig together. It's a simple process, but getting the order right and making sure your knots are solid will save you headaches on the water.
Threading Your Line
This is where it all begins, and getting the order right is crucial. First, take your main fishing line directly from your reel.
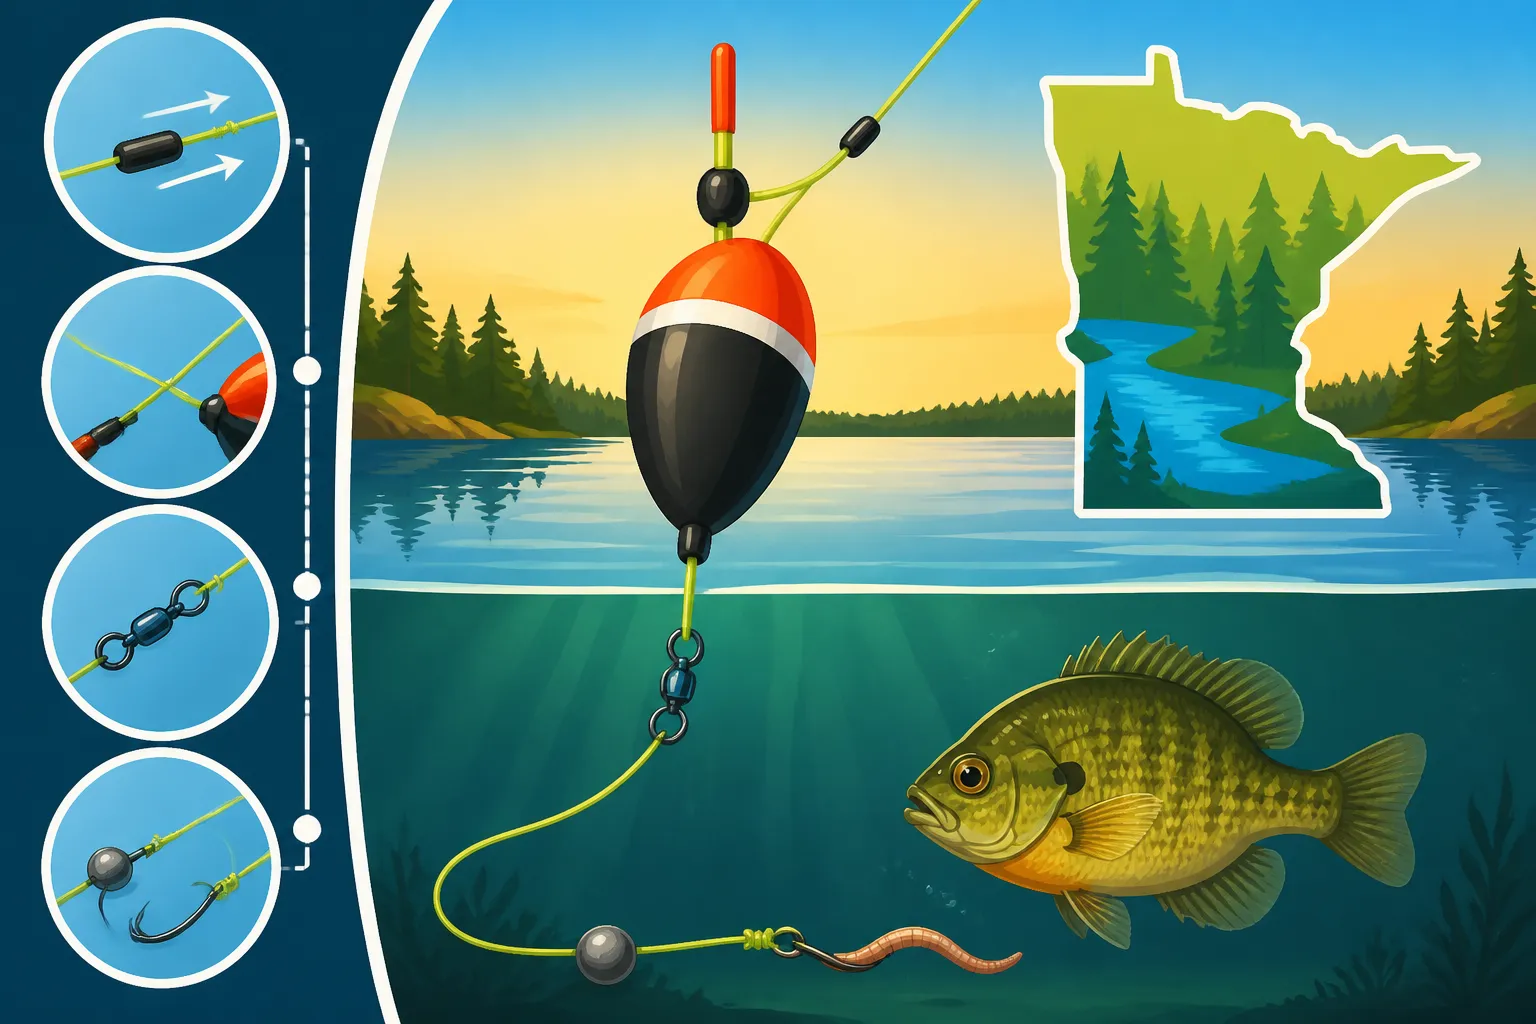
- The Bobber Stop: Grab one of your bobber stops. If it’s a string stop on a plastic tube, thread your main line through the plastic tube. Then, carefully slide the string knot off the tube and onto your main line. Gently pull both tag ends of the string to cinch the knot down. Don't yank it too hard yet, as you'll want to adjust its position later. This little knot is your depth control! You can find these pre-tied bobber stops easily at most tackle shops or on Amazon.
- The Bead: Next, slide a small bead onto your line. This bead is super important! Its job is to protect the knot of your bobber stop from getting pulled into the hole of your slip bobber, especially when you're fighting a fish or making a powerful cast. It acts as a buffer, ensuring the bobber stop stays effective and doesn't wear out prematurely.
- The Slip Bobber: Now, thread your main line through the center hole of your slip bobber. Make sure it slides freely up and down the line. If it snags, check for any rough edges or perhaps a stray piece of line. The bead you just added should sit just above the top of the bobber, ensuring the bobber stop doesn't get lodged inside.
Adding Weight and Terminal Tackle
With the bobber stop, bead, and bobber in place, it’s time to add the parts that will get your bait down to the fish.
- The Weight: Below the slip bobber, you’ll add your weight. If you're using split shot sinkers, crimp one or two onto your line. If you're using a sliding egg sinker or bullet weight, thread your main line through its hole. You'll want this weight to be heavy enough to pull your line through the bobber and sink your bait, but not so heavy it's overkill for the size of your bobber.
- The Swivel (Optional but Recommended): If you’re using a sliding egg sinker, or if you plan to use a fluorocarbon leader, it’s a good idea to tie on a small barrel swivel here. The sliding sinker will rest on this swivel, keeping it from sliding down to your hook. The swivel also helps prevent line twist, which can be a real nuisance, especially when using live bait like minnows or leeches.
- The Hook or Jig: Finally, tie on your preferred hook or jig to the end of your line, or to the free end of your swivel if you used one. For strength and reliability, solid knots like a Palomar knot or an Improved Clinch knot are excellent choices. The specific hook or jig you choose will depend entirely on your target species and bait. For panfish like crappie or sunfish, a small jig head (1/32 to 1/16 oz) tipped with a minnow or a piece of soft plastic is often deadly. For walleye, a plain hook (size 4 or 6) with a lively leech or shiner under a slip bobber is a classic, unbeatable presentation, especially if you're exploring Best Live Bait for Walleye (Leeches, Minnows, Crawlers).
Setting Your Depth and Testing
With your rig assembled, the final step before casting out is to set your depth and give it a quick test.
- Setting Your Depth: To set the fishing depth, simply slide the bobber stop up or down your main line. Want to fish deeper? Slide the bobber stop further away from your hook. Want to fish shallower? Slide it closer. It’s that easy! You can measure the distance from your bobber stop to your hook to get an accurate depth. Many anglers will measure this distance using their rod length as a rough guide, or even marking their line with a waterproof marker once they find the "sweet spot."
- Testing Your Rig: Before making your first cast, it's always a good idea to test your rig right next to the boat or from the shore if accessible. Drop your bait into the water and observe how the bobber sits. Is it floating upright with just the brightly colored tip showing? Is your bait reaching the desired depth? You might need to add or remove a tiny split shot to achieve that perfect balance. The bobber should be sensitive enough to show a bite, but stable enough not to be overly affected by surface chop. You'll quickly get a feel for the right amount of weight and the ideal bobber posture. Remember that How Many Lines Can You Fish in Minnesota is also regulated, so ensure you're compliant.
Refining Your Slip Bobber Approach
Setting up the rig is one thing, but truly mastering it comes from understanding how to use it effectively in varying conditions and for different species. It's about more than just fishing; it's about connecting with the subtle nuances of the water and the fish.
Matching Bait and Water Conditions
The real beauty of a slip bobber lies in its incredible versatility. It allows you to precisely present your bait at a specific depth, which is paramount when fish are holding tight to a particular stratum in the water column.
For example, if you’re fishing for Black Crappie in Minnesota in early spring, they might be shallow, concentrating in bays or near emergent vegetation, in which case you might only set your bobber to 3-5 feet. But come the dog days of summer, those same crappies might suspend 15 feet down over 20 feet of water in the main lake basin. Your slip bobber lets you target them precisely at that summer depth, no matter how deep it is. Similarly, when targeting walleye on a massive lake like Leech Lake, they might be relating to the bottom during the day, but suspend higher in the water column at night. A slip bobber lets you follow them.
Consider your bait, too. A lively minnow needs room to swim naturally without being constrained by too much weight. A worm or leech might simply hang vertically. Match your weight to your bait's activity and buoyancy. In windy conditions, a slightly heavier bobber and weight system can help your bait stay in the strike zone longer without drifting too quickly. Don't be afraid to experiment with different baits and depths until you find what the fish are responding to on a given day, as fish patterns are heavily influenced by Seasonal Fishing Patterns in Minnesota.
Optimal Rods, Reels, and Line for Slip Bobbers
While you can technically use almost any rod and reel for slip bobber fishing, having the right gear will significantly enhance your experience and success.
For most slip bobber applications in Minnesota, a medium-light to medium action spinning rod, typically between 6'6" to 7'6" in length, offers a superb balance of casting distance, sensitivity, and enough backbone to handle a good fight. The longer length helps with casting further and with taking up slack quickly after a bite. Paired with a decent quality spinning reel (a 2500 or 3000 series is often a good match), you'll have a smooth retrieve and enough drag to manage various fish sizes. When considering Best Walleye Rods & Reels, a good sensitive spinning rod is often at the top of the list for bobber fishing.
As for line, monofilament is a very popular choice for slip bobber fishing. Its inherent stretch acts as a shock absorber, helping to prevent hooks from tearing out of a fish's mouth, and its buoyancy can help keep your line on the surface, which is sometimes preferred for bobber watching. However, some anglers prefer fluorocarbon for its near-invisibility and increased sensitivity, or even a thin braided line with a fluorocarbon leader for ultimate feel and strength. The knot for your bobber stop tends to cinch better and hold more securely on mono or fluorocarbon than on slick braid, but specialized braided bobber stops are available if you prefer a full braid setup. Many excellent options for fishing line and reels, including those from brands like Berkley or Sufix, can be found readily on Amazon. The choice often comes down to personal preference and the specific conditions you're facing. If you want to dive deeper into line options, check out Best Fishing Line for Walleye (Braid vs Mono vs Fluoro).
Understanding Fish Behavior and Location
Ultimately, the best slip bobber rig in the world won't catch fish if you're not putting it where the fish are. The key to consistent success with any fishing technique is knowing where the fish are holding and understanding their behavior.
Utilize your electronics – whether it's a simple depth finder or advanced side imaging – to locate schools of fish, suspended targets, or key structural elements. Look for submerged humps, weed lines (especially the deeper edges), rock piles, timber, or even subtle transitions in bottom composition. Once you've identified potential fish-holding areas, a slip bobber allows you to present your bait exactly at their level.
For instance, if your fish finder shows a school of crappies suspended 12 feet down over a 25-foot flat, you can precisely set your bobber stop to 12 feet and present your bait right in front of their noses. If you're targeting walleye relating to a deep break on Lake of the Woods, you can adjust your depth to keep your bait hovering just above the fish you see on your screen. Don't be afraid to experiment with depth until you find the sweet spot. Sometimes moving your bait just a foot or two can make all the difference between a slow day and a banner one. Observing how fish react to different depths and presentations is a continuous learning process that makes fishing so rewarding. Always remember to consult the specific Minnesota Fishing Limits: Bag & Possession for the species you are targeting in your chosen body of water.
Important Fishing Disclaimer
Fishing regulations, conditions, and best practices can change rapidly due to environmental factors, fish population management, or legislative updates. Always consult the latest Minnesota Department of Natural Resources (DNR) regulations and advisories before heading out on the water. Stay safe and fish responsibly!